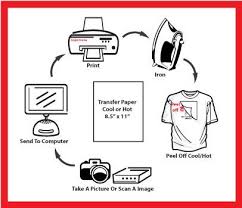
Transfer paper for t-shirts has numerous uses, and the only thing that’s going to limit you is your own imagination.
This kind of paper allows you to work with aprons, sweatshirts, bags, and t-shirts while creating your design like signatures and doodles. You can also play around with digital photos, add text and emojis on them before creating wearable art out of them.
Using iron on transfer paper is a fun activity you can try with your family or friends. You can come up with your artwork, create a signature design for a family event, business promotion, or come up with cute gift ideas. All you need to have to start are transfer papers, PC, printer, and an iron. If you have a heat press machine, all the better!
Working on iron on transfer paper can be fun, but you have to watch out for these common mistakes:

- Before printing, check if you’ll be printing on the right side of the transfer paper. This is very tricky, so you have to be careful. Take time in setting the paper up in the printer tray to make sure the images and design will be printed on the right side.
- Remember to print only in mirror mode. This is especially true when you’ll be printing on light colors. When you’re printing on designs with a light background, switch your printer’s printing setting to mirror mode. If you fail to do this, the image will be printed wrongly.
- Take time in cutting the edges of the image you printed. If you’re not careful while cutting the corners of the image, there will be excessive transfer paper left that will adversely affect the beauty of your design.
- Only iron the transfer paper on a flat and smooth surface. Make sure that the ironing surface is free from small debris to avoid damaging the design. If you fail to follow this tip, you’ll find out that the design isn’t attached solidly to the fabric.
- It’s okay for the iron to get really hot. Don’t panic. It’s essential that the iron you use is set to its maximum temperature and is sufficiently heated before ironing the transfer paper. It’s also necessary to switch off the steam when using a steam iron.
- Be mindful of the iron and never keep it still. The issue with newly designed irons is that they don’t have indentations on its bottom part to allow steam to pass through. If you keep the iron still for a long time, parts of the image might be stuck down.
- Apply an ample amount of pressure when ironing the transfer paper. The pressure you apply on the iron will either make or break the entire transfer process.
- Remember to iron out the surface evenly. Make sure you’ve ironed out all of the surfaces. If you leave a particular area unironed, the images might be broken or look incomplete.

If instead of doing this project by yourself, you prefer to contract the services of a design expert, feel free to contact PrintOnIt. They have a wide array of designs you can choose from. If not, you can talk to them and have them work on your personalized design.
Have fun unleashing your creative side!

